
Toolbar Manual
Tool Groups › Project
 New Animation Project
While Photoshop’s “New Document” window provides a few industry standard video presets, it lacks the option to configure and create a Timeline. When starting a new animation project from the Animator’s Toolbar, the “New Animation” window will provide you with the options to configure the timeline parameters (duration and frame rate) of your project.
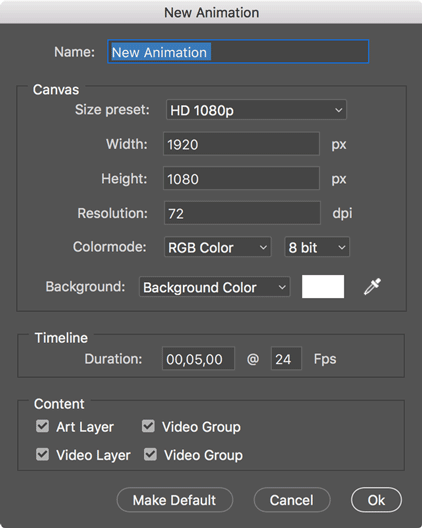
Name: The name of your Photoshop Animation Project. The default name on opening the panel can be changed in the “Toolbar Setting” accessible from the toolbar’s fly-out menu.
Canvas: Set the canvas size and background colour of your new Photoshop Animation Project. Use the Size preset drop-down menu or enter values manually. Use the Background drop-down to select a default background colour or select a custom colour.
Timeline: The default duration of the timeline can be changed by entering a comma separated timecode notation (i.e. mm,ss,ff) or a total number of frames (i.e. ff) in combination with the preferred frame rate. Note: Keep in mind that Video Layers inherit the frame rate and duration from the timeline state. It’s not possible to set a new source duration of a Video Layer after it’s been created.
Content: Optionally generate an Art Layer or Video Layer on the timeline and choose if the layer is contained in a Video Group.
Make Default: Save all values as the default setting the next time the New Animation panel is opened.
Cancel: Closes the New Animation panel.
Ok: Creates a new document and generates a timeline with the preferred settings.
+ ⇧ New Project with default settings
Hold [Shift] to skip the New Animation Project window and create a new animation project with the saved/default project settings.
Increment and save
Text
+ ⌥ Render Video
Hold [Alt] to open the Render Video dialogue.
This is just a shortcut for File › Export › Render Video…
 Toggle Timeline Shortcuts
Turn the Timeline Keyboard Shortcut Keys on when they’re off and off when they’re on.
 Toggle Favourite
This function gives you control over what is shown in the Timeline Panel without changing the visibility on the canvas. (If you are familiar with After Effects you can best think of this function as a reversed “Shy” button.)
To make this work you start by selecting the Layers/Groups you’re working on. Then [ALT] click this button to mark the selected layers as favourites. All other Layers will be automatically hidden from view in the Timeline.
Clicking this button again will toggle the visibility of the layers NOT marked as favourite in the Timeline, on or off.
+ ⌥ Set Favourite
[ALT] click this button to mark the selected layers as favourites.
Marking a new selection of Layers as favourite will override the current favourites setting.